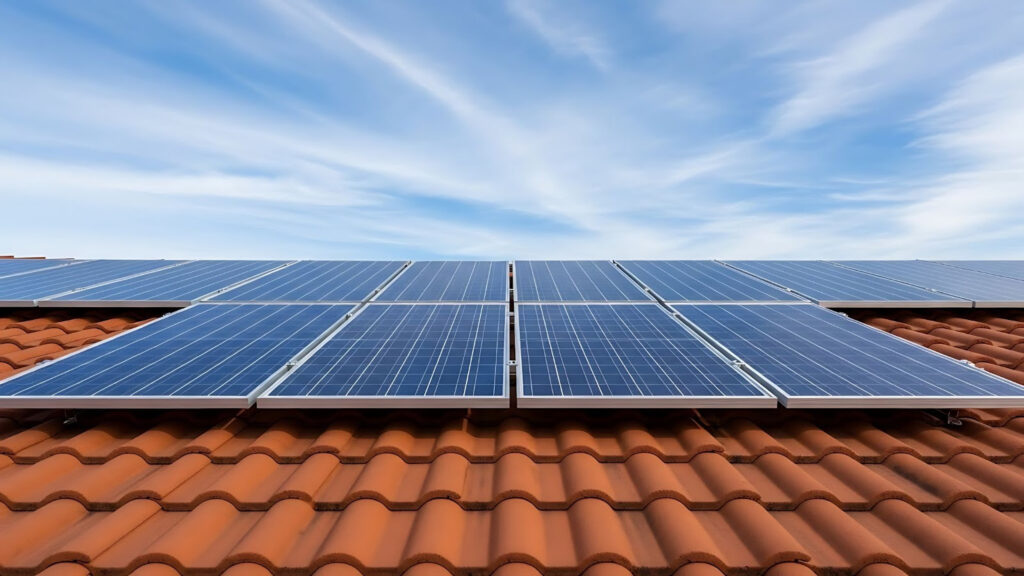
You’re considering solar for your Central California home, but you have a tile roof. You’ve heard the installation is complicated, expensive, or could damage your roof. Here’s the straightforward answer: Yes, you can absolutely install solar panels on tile roofs, and it’s done successfully every day across Fresno, Clovis, and surrounding areas.
The key is proper installation technique and experienced professionals who understand tile-specific mounting requirements. With 40+ years of installing solar on Central Valley tile roofs, from Spanish clay to concrete flat tiles, we’ve seen what works and what causes problems. This guide walks you through the process, costs, and what to expect when installing solar panels on your tile roof.
How Solar Panels Are Attached to Tile Roofs
Tile roofs require different mounting approaches than composition shingle roofs. The main difference is how the mounting hardware connects to your roof structure while preserving the weatherproof integrity of your tiles.
Two Primary Installation Methods
Professional installers use two main approaches depending on your specific tile type and roof configuration.
Tile removal and flashing (most common)
- Tiles are temporarily removed at attachment points
- Mounting hardware is secured to rafters
- Metal flashing is installed for waterproofing
- Original tiles are reinstalled around mounts
Tile hooks or tile replacement mounts
- Used on specific tile profiles
- Minimizes tile removal but is not compatible with all roofs
Most professional installers prefer tile removal with flashing because it provides the strongest and most leak-resistant installation.
The Installation Process
- Roof assessment: Detailed inspection to identify tile type (clay, concrete, flat profile, or Spanish barrel) and confirm the roof can support the system’s weight.
- Layout planning: Minimizes the number of tiles that need removal.
- Tile removal: Tiles are carefully removed in sections to access mounting areas.
- Flashing installation: Creates a watertight seal at each mounting point.
- Mounting hardware: Secured directly to roof structure for stability.
- Tile replacement: Original tiles reinstalled to maintain proper alignment and weatherproofing.
- Panel installation: Racking system and solar panels mounted to secured hardware.
The tile process is more time-intensive than working with shingle roofs. Each tile must be handled carefully to prevent cracking, and the flashing work requires precision to prevent any future water intrusion. This is exactly why installer experience matters so much with tile roofs.
Will Solar Installation Damage Your Tile Roof?
Here’s the honest answer: proper solar installation doesn’t damage tile roofs. Poor installation absolutely can cause problems, which is why choosing experienced professionals matters more with tile than any other roof type.
What Can Go Wrong With Inexperienced Installers
- Cracked or broken tiles during removal and replacement
- Improper flashing techniques that lead to water intrusion
- Inadequate structural support causing ongoing stress to tiles
- Improper roof penetrations that void your existing roof warranty
How Professional Installation Prevents Damage
Experienced installers use careful tile removal techniques that minimize breakage. Proper flashing and waterproofing at every mounting point ensures water sheds away from penetrations exactly as your roof was designed to do.
Weight distribution across the roof structure matters tremendously. Solar systems add 3-4 pounds per square foot, and that load must be properly distributed across rafters and structural members. When tiles are replaced, they’re set in the same pattern and position as the original installation, maintaining the weatherproof integrity of your roof system.
What to Expect: Pricing and Investment Considerations
Let’s be straightforward about tile roof solar costs: installations typically run 10-20% more than standard shingle roofs. This reflects the additional labor required, specialized equipment, and careful tile handling necessary to protect your roof.
In Central California, where tile roofs are common on homes throughout Fresno, Clovis, and surrounding areas, experienced installers like us don’t charge premium rates because tile work is part of our everyday expertise. The cost difference reflects real work, not unfamiliarity.
What Affects Your Installation Cost
Tile type and condition:
- Clay tiles require different handling than concrete tiles
- Flat profile tiles are simpler than Spanish or barrel tiles
- Older tiles may be more brittle, requiring extra care
Installation complexity:
- Steep roof pitches require additional safety equipment
- Multiple roof planes or complex layouts increase planning time
- Number of tiles requiring removal and replacement
Your investment includes:
- Base solar system cost (panels, inverters, electrical components, monitoring)
- Additional labor for tile handling
- Replacement tiles if any break during installation
- Tile-specific flashing and mounting hardware
What makes it worthwhile:
- 30% federal tax credit applies to entire installation cost, including tile work
- Long-term electricity savings typically offset higher upfront investment within 5-8 years
- Custom system design maximizes efficiency for your specific roof
Is Your Tile Roof Ready for Solar?
Most tile roofs are good candidates for solar, but installers evaluate several key factors before moving forward.
Roof Age and Condition
A tile roof should be in good condition with at least 15 years of remaining life. Solar systems last 25 years or more, and replacing a roof after panels are installed adds unnecessary cost.
If tiles are brittle, damaged, or nearing the end of their lifespan, replacing the roof before solar installation is usually the best option. This allows the new roof to last the full life of the solar system and avoids paying for panel removal and reinstallation later.
Structural Support
Installers confirm the roof structure can handle the added weight of solar panels and mounting hardware. Most systems add 3 to 4 pounds per square foot, which is well within the capacity of properly built tile roofs, but structural verification is required.
Tile attachment methods and underlayment conditions are also inspected. Any leaks, worn materials, or needed repairs should be addressed before installation to prevent future issues.
Central Valley Considerations
Spanish tile roofs are common in Fresno and Clovis and are fully compatible with solar when mounted correctly.
Heat management is important in the Central Valley. Panels must be installed with enough clearance to allow airflow underneath, which helps maintain efficiency during hot summers.
Wind exposure is also reviewed, especially for homes in open or elevated areas. Mounting systems are selected to meet local wind requirements and ensure long-term stability.
Tile Types and Compatibility
Concrete tiles in good condition are ideal for solar. They are durable, uniform, and easier to remove and reinstall. Flat or low-profile tiles simplify mounting, and replacement tiles are usually easy to source.
Spanish or barrel tiles require more planning but work well with experienced installers. Custom, older, or discontinued tiles may need matching services, which is standard for professional installations.
Tile Replacement Planning
Some tile breakage can occur, especially on older roofs. Professional installers minimize damage and plan ahead by identifying tile type and availability before work begins.
Most modern tiles are readily available. For discontinued styles, tile matching services can provide suitable replacements to maintain a consistent appearance.
The Installation Timeline and Process for Tile Roofs
Tile roof solar installations usually take 2 to 4 days. The longer timeline reflects careful tile removal and reinstallation, not installation delays. Here are the key steps involved in the process.
Before Installation Begins
Before work begins, installers complete a final site review and confirm system measurements. Permits and utility interconnection requests are submitted while materials are prepared.
Tiles are inspected for existing damage, and replacement tiles are identified in advance if needed.
During Installation
Crews mark mounting locations based on the approved design. Tiles are removed at each attachment point and set aside.
Mounting hardware is secured to the roof structure and sealed with flashing. Tiles are then reinstalled to maintain proper water flow.
Racking is installed next, followed by the solar panels. Electrical connections and inverter equipment are completed once panels are in place.
What to Expect at Your Home
Crews work on the roof using standard safety equipment. Access points are planned to reduce impact on landscaping. Work areas are kept clean, and debris is removed daily.
If weather becomes an issue, exposed areas are protected until work resumes.
After Installation
The system is inspected and tested. Panels do not produce power until the utility grants Permission to Operate. This approval usually takes 2 to 4 weeks.
Once approved, monitoring is set up so you can track energy production. Warranty documentation is provided, and system operation is explained.
Common Tile Roof Solar Concerns
“Will my tiles match if you have to replace any?”
For common tile styles, matching is straightforward. For older or discontinued tile patterns, tile matching services specialize in sourcing appropriate replacements. Replacement cost is typically included in your project quote.
“What about leaks from roof penetrations?”
Proper flashing prevents water intrusion at mounting points. Each mounting point is individually flashed with materials designed for long-term weatherproofing. Our 25-year workmanship guarantee specifically covers leak issues related to installation.
“Does solar installation void my roof warranty?”
This depends on your specific roof warranty terms. Professional installers work within warranty requirements, using approved flashing methods and attachment techniques. During your consultation, we can review your specific roof warranty and explain how installation affects coverage.
“Can solar panels crack more tiles over time?”
No. Once installed, solar systems don’t move or create ongoing stress on tiles. Mounting systems are engineered for permanent, static installation. Solar panels actually protect the tiles directly beneath them from sun exposure and weather.
The Hidden Advantages of Solar on Tile Roofs
While tile roofs require more careful installation, they provide genuine benefits for solar system performance and long-term value.
Long-Term Durability
Tile roofs often last 50 years or more, while solar systems last 25+ years. This allows most homeowners to install solar once without needing roof replacement during the system’s lifespan. Tile surfaces also protect flashing and mounting points from prolonged sun and weather exposure.
Heat Performance in the Central Valley
Tile roofs perform well in high heat, which is why they are common in Fresno, Clovis, and Sacramento. Unlike asphalt shingles, tiles do not break down as quickly under prolonged heat, helping mounting points remain stable over time.
Improved Solar Efficiency
Tile roofs create natural airflow beneath solar panels. Proper spacing allows heat to dissipate, keeping panels cooler. Cooler panels operate more efficiently, which improves energy production during hot summer months.
Added Property Value
Tile roofs are a premium roofing material, and solar increases their appeal. Together, they improve energy efficiency, reduce utility costs, and contribute to higher resale value.
What to Look for in a Solar Company for Your Tile Roof
Not all solar installers have equal experience with tile roofs. Choosing the right company protects your roof investment and ensures proper installation from the start.
Experience With Tile Roofs
Look for installers with direct experience working on tile roofs, not just general solar experience. Clay, concrete, flat, and Spanish tiles each require different mounting techniques.
Ask to see examples of completed tile roof projects. Installers familiar with Central California tile styles work more efficiently and are less likely to encounter problems during installation.
Workmanship Warranties
Many installers offer only 5 to 10 years of workmanship coverage. A longer warranty provides better protection over the full life of the solar system. Always confirm whether tile damage, leaks, and mounting issues are included. Review warranty details carefully and get answers in writing.
In-House Crews vs. Subcontractors
Companies that use in-house installation teams maintain consistent quality standards. Installers follow the same training and procedures on every project.
Companies that rely on subcontractors may have inconsistent results. Different crews bring different experience levels, which increases risk on tile roofs where careful handling matters. In-house teams also provide clearer accountability if issues arise.
Red Flags to Avoid
- Claims that tile roofs do not increase installation cost
- Limited or vague workmanship warranties
- Lack of tile-specific project examples
- Sales pressure without clear answers about tile installation methods
These signs often indicate limited experience or corner cutting.
Questions to Ask Before Choosing an Installer
- How many tile roof solar installations have you completed?
- What steps do you take to protect tiles during installation?
- What warranty covers tile damage or roof leaks?
- Do you use in-house installers or subcontractors?
- Can you show me tile roof projects completed in my area?
Clear, detailed answers indicate experience and transparency.
Moving Forward with Solar on Your Tile Roof
Tile roofs can support solar installations when proper mounting methods and experienced installers are used. The difference between a long-lasting, leak-free system and ongoing roof issues often comes down to tile-specific expertise and careful installation practices.
At Pacific Solar, we have helped Central Valley homeowners install solar on tile roofs since 1982. Our experience with local tile styles, roof structures, and climate conditions allows us to design systems that protect roof integrity while delivering reliable performance.
Schedule a free solar consultation to get an honest evaluation of your tile roof and its suitability for long-term solar performance.
FAQs
How do they attach solar panels to a tiled roof?
Installers secure mounting hardware directly to the roof rafters, not the tiles. Tiles are temporarily removed at attachment points, flashing is installed to seal each penetration, and the tiles are reinstalled around the mounts. This method keeps the roof watertight and structurally sound.
What is the 33% rule in solar panels?
The 33% rule is an informal planning guideline sometimes used by utilities or installers. It suggests a solar system should not exceed roughly one-third of a home’s annual electricity usage in certain situations. It is not a technical limit and does not apply to all homes or utility programs.
Why is my electric bill still high if I have solar panels?
High bills can result from system size, energy usage habits, utility rate changes, time-of-use billing, or seasonal production differences. Solar offsets energy use, but it does not eliminate all utility charges, especially if consumption increases after installation.
What type of roof is not good for solar panels?
Roofs in poor condition, near the end of their lifespan, or with significant structural issues are not ideal for solar. Roofs with heavy shading or limited usable space may also produce less energy. These issues should be evaluated before installation.